
Building the Static Library
From automobile systems and industrial machinery to smartphones and IoT devices, embedded systems are essential to the operation of a wide range of products. At the heart of every embedded system lies software, carefully crafted to meet the highest performance, size, and efficiency requirements. Throughout this process, embedded C libraries are essential building blocks that provide an array of pre-written functions and routines specifically tailored for embedded environments.
A wide range of libraries, from basic standard C and math libraries to sophisticated real-time operating system (RTOS) and graphics libraries, are essential to the creation of embedded systems. While many developers integrate existing libraries into their applications, some situations call for custom solutions. Whether it’s crafting a function to accommodate unique constraints or devising a custom communication protocol, the need for tailored solutions occasionally arises. While embedding such functionalities directly within the project’s source code is a viable approach, an alternative approach exists: static libraries.
What is a Static Library?
These self-contained bundles of precompiled functions offer a reliable way of encapsulating custom logic, fostering modularity and ease of integration within larger projects. Additionally, the libraries are packaged in a single file, making it easy for developers to build them ahead of time and seamlessly integrate them with their main source code during compilation.
One of the key advantages of static libraries is their versatility.
By encapsulating functions within a library, developers can create a repository of reusable components, increasing code modularity and simplifying maintenance.
Consequently, the flexible structure simplifies code reuse across projects, accelerating development cycles, and ensuring consistency across applications. Static libraries enhance code encapsulation and security. By abstracting implementation details behind well-defined interfaces, developers can shield sensitive code from external manipulation, ensuring system integrity while minimizing potential vulnerabilities.
Create it Yourself
Embarking on the journey of static library creation and implementation can vary based on individual setups and the tools used. To illustrate and demystify this process, let’s delve into the fundamentals, leveraging STM32CubeIDE alongside a NUCLEO-L476RG board as our platform. We will develop a library that streamlines the challenging task of… Blinking an LED.
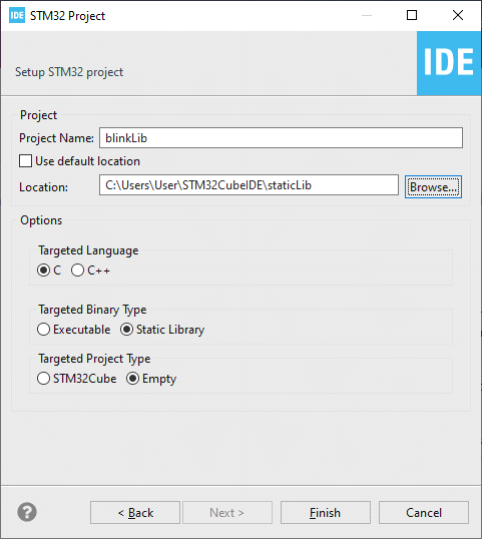
Initially, our aim is to establish a static library. Begin by initiating a new STM32 project, where you’ll designate your target board, assign a project name, and specify the targeted binary type as Static Library with targeted project type as an Empty.
Next, we will delve into the library implementation phase. We’ll create three essential source files:
- blink.h: This file will house declarations for our library’s functions.
- blink.c: Here, we’ll implement the functionalities of our library’s functions.
- blinkHal.h: This file will contain declarations of external functions that need implementation in the application for the library to function effectively on the target device.
Our blink.h file is fairly simple and contains only one declaration:
#include "stdint.h"

/**
* @brief Blinks a led
* @param cnt Number of blinks
* @param duty Duty cycle, %
* @param period Blink period
*/
void Blink(uint8_t cnt, uint8_t duty, uint16_t period);
To make LED blink, one must define its control. While it’s tempting to embed this directly into the library, we opt for abstraction, empowering library users to specify it later. This abstraction is used in the function implementation within blink.c:
#include "stdint.h"
#include "blinkHal.h"

void Blink(uint8_t cnt, uint8_t duty, uint16_t period)
{
  uint8_t i;
  if (duty > 100)
  {
    // Do not exceed 100% duty
    duty = 100;
  }

  for (i = 0; i < cnt; i++)
  {
    BlinkHalLedOn();
    BlinkHalDelay(period * duty / 100);

    BlinkHalLedOff();
    BlinkHalDelay(period * (100 - duty) / 100);
  }
}
Lastly, we must outline functions to be implemented in the application within blinkHal.h:
/**
* @brief Delay in ms
* @param delay Ms to delay
*/
void BlinkHalDelay(uint32_t delay);

/**
* @brief Turn led on
*/
void BlinkHalLedOn(void);

/**
* @brief Turn led off
*/
void BlinkHalLedOff(void);
Upon completion of the build process, a static library dubbed libblinkLib.a will be created.
Time to Use it!
With the static library prepared, our next step is to set up a standard project to incorporate it.
Create an executable project, opting for the NUCLEO-L476RG board, and initialize it in default mode.
Transfer the files libblinkLib.a, blink.h, and blinkHal.h into your project directory. Additionally, create and implement the blinkHal.c file:
#include "main.h"

void BlinkHalDelay(uint32_t delay)
{
  HAL_Delay(delay);
}

void BlinkHalLedOn(void)
{
  HAL_GPIO_WritePin(LD2_GPIO_Port, LD2_Pin, GPIO_PIN_SET);
}

void BlinkHalLedOff(void)
{
  HAL_GPIO_WritePin(LD2_GPIO_Port, LD2_Pin, GPIO_PIN_RESET);
}
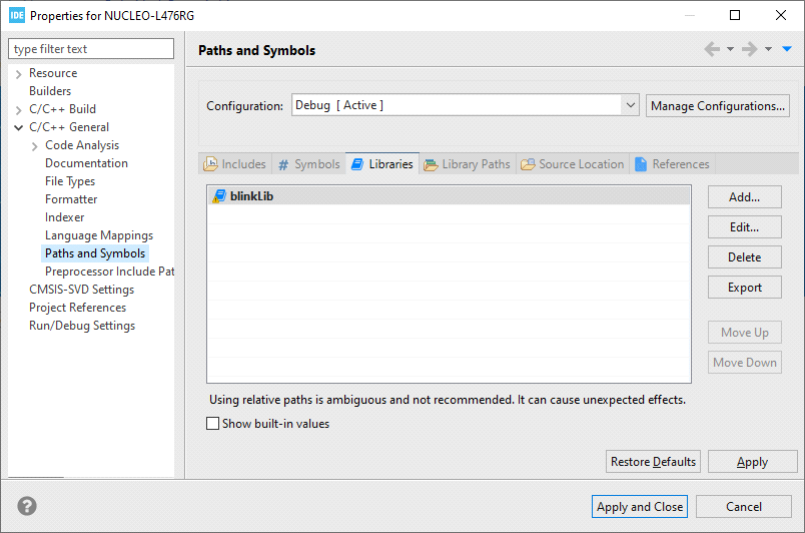
Within the project properties, specify the name of the library being used in Project properties -> C/C++ General -> Paths and Symbols -> Libraries along with path to it in Project properties -> C/C++ General -> Paths and Symbols -> Library Paths. Note that the library name should be provided without the “lib” prefix and the “.a” suffix.
All that remains is to utilize the Blink function:
#include "blink.h"

<...>

uint8_t i;

for (i = 0; i < 100; i++)
{
  Blink(1, i, 200);
}
And witness it in action!

Request a quote now and unlock new possibilities for your embedded systems projects!